
Real Connections. Real People. Authentic Content.
Product Lead | Concept | UI / UX
Graphics | Branding | Name
About Dayblizz
What is Dayblizz?
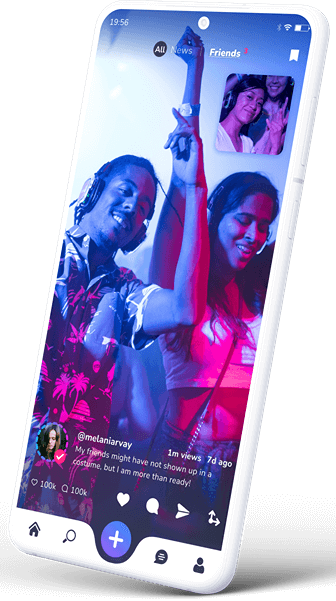
A social media mobile app for creating, sharing and monetizing social media content, while connecting with your fans and followers.
Dayblizz is a multi-media full screen app including image-, video- and discussion content in a vertical full-screen mode.
It enables users to easily filter their user experience, so they can enjoy either mixed content, content posted by their friends or only photo, image or discussion content.
Dayblizz includes various ways to monetize content through subscriptions, tipping, custom content requests or shop sales.
Product Background
Dayblizz was originally designed between December 2018 and May 2019. I continuously worked on the Dayblizz product from May 2019 until October 2022 to refine the app.
Dayblizz is targeted at GenZ creators of music, acting and modeling content and the consumers of this content. They are primarily 16-24y old, based in North America and Europe and are interested in monetizing their content (creators) or connecting with their favourite social media creator (consumers).
Why Dayblizz was created
Content creators are as important to GenZ as movie stars were to young people in the 80s/90s. They are boosting the engagement on social platforms, but even though GenZ spends almost 4h a day on social media, the creators that are responsible for garnering that attention often still don’t profit from their content creation.
That’s why Dayblizz was created: To create a social media app, that provides a holistic user experience, by merging the social aspects of social media and monetization options for content creators into one fluent user experience.
MY ROLE:
Founder, CEO, Product & UI/UX Designer
Singlehandedly responsible for the entire idea, concept and design process, from research to wireframes, mockups, prototyping, testing and quality assurance, as well as the product management and business administration.
Understanding the User
In order to understand the users better I conducted both individual interviews with content creators and end customers, as well as incentivized online surveys through surveysparrow.
Pain Points
~60%² of creators don’t make a liveable income
Many apps are using the popularity of creators for themselves, without giving anything back. Creators have to depend on brand deals and have a very irregular income.
Low chance of being discovered & having a hard time producing content
Producing content is hard and it’s unlikely to be discovered. Platforms like Facebook reduce the reach of accounts by up to 90% when reaching certain treshholds.
Negative Impact on Mental Health
Constant comparison to other people’s inauthentic & fake lifes on social media. Up to 58% of US users report a negative effect on their mental health².
Ideas for Solutions
Everyone can earn money with their content
Fans can support creators with tips or monthly subscriptions. This results in a more predictable income stream.
Fans can contact their idols through the premium-features – but the creator keeps full control over the degree of communication.
Easy ways to create & creators keep 100% of their reach
Everyone can become a creator. We suggest users new content and creators, share and feature even more unknown creators.
Authentic Interaction
Offering features that ensure & incentivize authentic and creative content. Taking the pressure away, by making like counters optional.
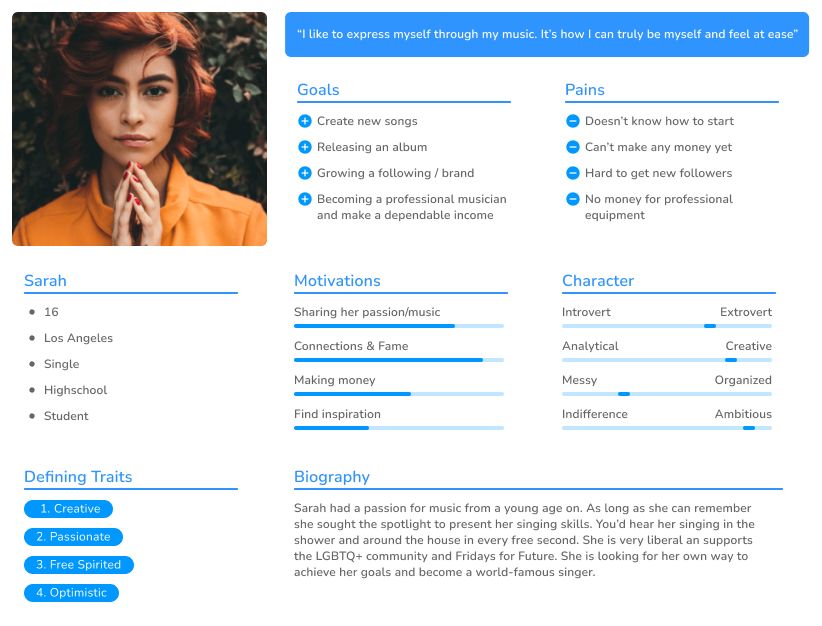
Persona: Creator
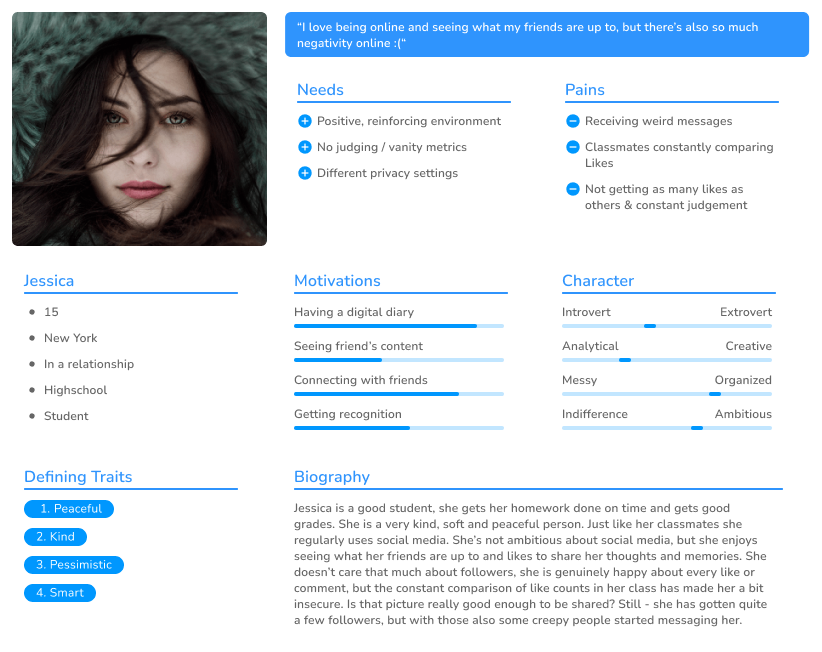
Persona: Consumer
Designing Dayblizz
At first I drafted some first designs on paper, iterating on different design ideas and once drafting up the entire userflow and app. Then I turned those into simple digital wireframes and mockups using Gimp & Adobe Photoshop (2018).
I then drafted the first prototyp using the Marvel App.
You can see it here, when viewing from Desktop zoom out until it fits the screen
I used these to receive feedback from potential users. I learned that the app has to many options for the user to easily understand it. Hence I decided to dial down the amount of initial features and also reduce the app to a full-screen and mobile-only approach, instead of enabling a switch between full-screen and feed-view.
The following high fidelity mockups explain the structure, features and thought process of the entire app.
I also went on to transition to using Figma for designs and overall adapted the design.
Takeaways
Dayblizz was the first company I ever started and the first product I ever designed. Dayblizz ended up getting me two founder scholarships in Germany, won product of the day #5 on producthunt and had about 1000 total signups.
We were able to convince many creators to join us, which also ended up using our subscription feature on the platform.
Personally I loved the challenge of building and designing a social media app, given what we wanted to achieve I ended up designing about 500 final mockups to display all options of the app, not including any variations, iterations etc. that I made.
Some of the key challenges for me were to come up with a comprehensive design to display all the options and the set-up of the monetization features on a mobile-only app. There weren’t a lot of references available, since most competitors only or primarily offered this type of set-up on desktop and not on mobile. So I had to come up with it from scratch.
Given that this was quite the extensive product to work on, I was able to really dive deep into market and user research and come up with design solutions for the social media space. Throughout the many iterations that I did, after coming across new insights, I was able to really hone my user interface and experience design skills and improve them greatly throughout the product’s lifecycle.
In-App Videos
Login & Registration
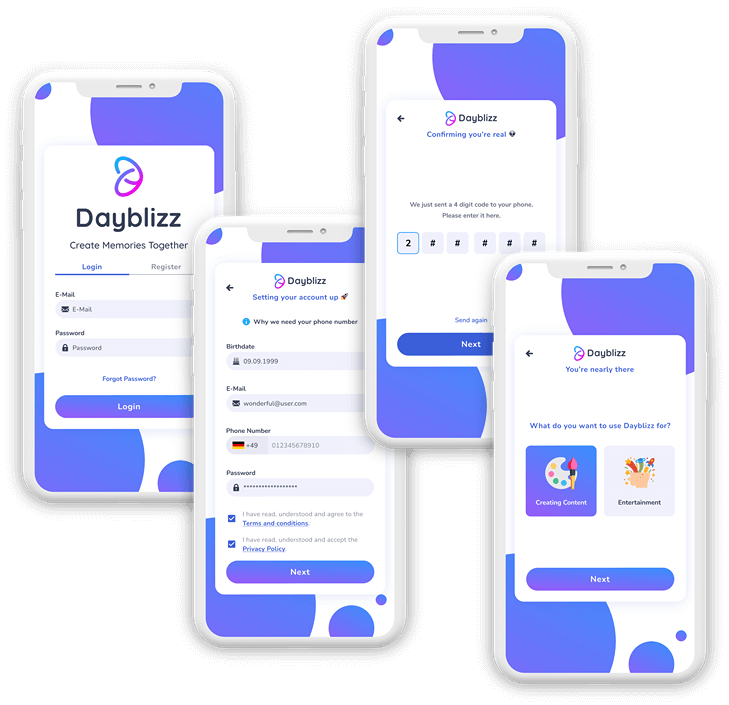
After the Dayblizz splash screen the user can login, reset their password or register a new account.
When a user registers a new account, we need the birthdate to verify the age of at least 18 and also require a phone number, to make sure the user is a real person. Of course we also ask the user to set their login email and password.
We also verify the user’s phone number using a 6 digit code sent to their phone. Afterwards, the user can select what they’d want to use Dayblizz for: creation or entertainment. This account type can be changed at any point later on. In order to use Dayblizz to monetize content the user has to create a creator account first.
The user doesn’t have to fill out an entire profile before using the Dayblizz app, instead they’ll be able to use the app right away and can decide to personalize their account at any later point in time.
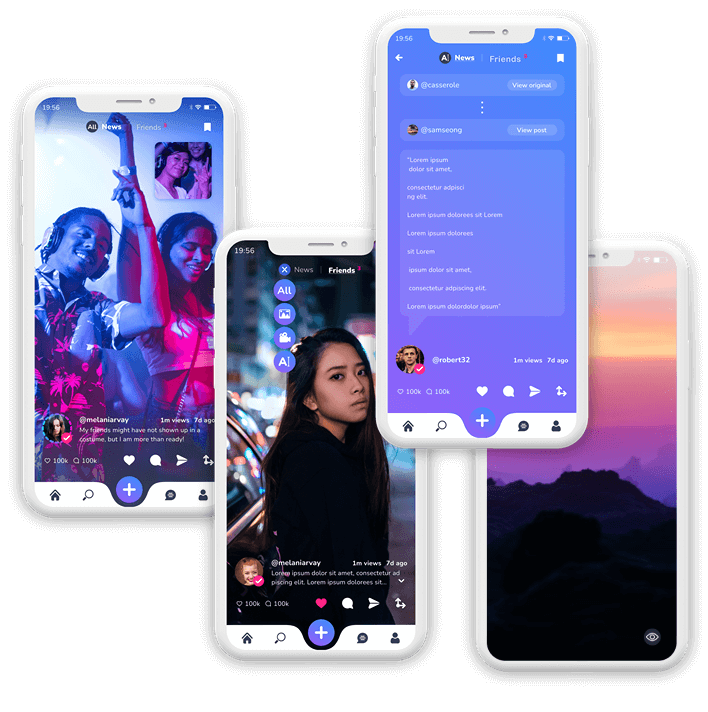
Content Feed
The Dayblizz feed allows for versatile usage.
The “News” feed itself is a mixed media feed displaying content from friends, people you follow and discovery content. You can filter the feed at any point in time to display exclusively image, video or interactive text content. This enables you to dial Dayblizz down to a user experience targeted at a specific type of content.
You are also able to switch to your “Friends” feed to always stay on track what your friends are doing. A number next to the feed displays how many posts have been shared by your friends since the last time you checked. This feed will only show users, who have accepted the friendship request that you sent them.
To make Dayblizz more interactive, we also enabled “reposts”. Reposts allow for threaded responses and discussions. Users can always go back to the original post and read through any of the previously shared responses by tapping on the “bubbles” to open them.
Creating more space for entertainment:
By tapping / swiping the arrow icon in the lower right, the interface disappears, allowing to gain an unobstructed view onto video, image and text content. One tap on the eye icon in the lower right area is enough to bring the interface back on screen.

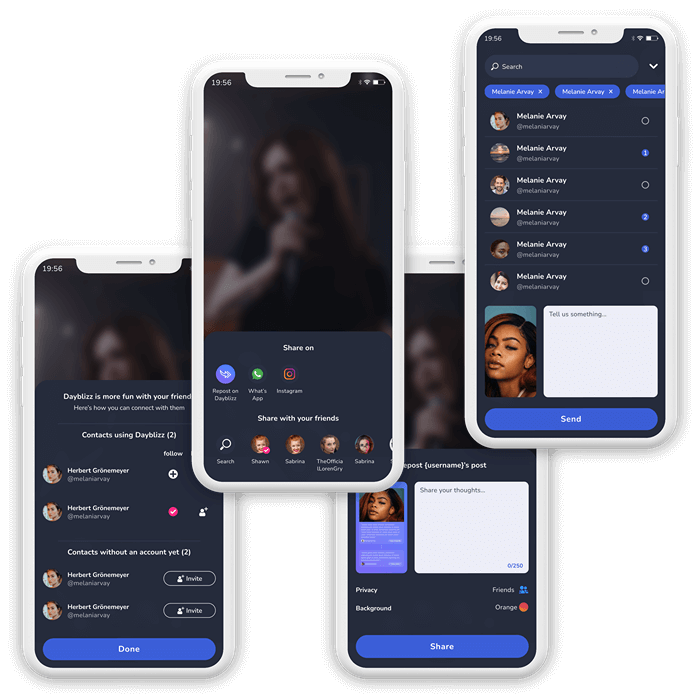
Connecting on Dayblizz
After you’ve joined Dayblizz and explored the app for a while, we will ask you whether you want to find your contacts and friends on Dayblizz. This is completely optional, but if you agree we will temporarily sync your contacts (and delete them afterwards) to show you who is already using Dayblizz, so you can immediately follow your friends or send them a friendship request.
In order to be more interactive, Dayblizz supports shares on other social media apps, as well as sharing content within the app through our messaging system.
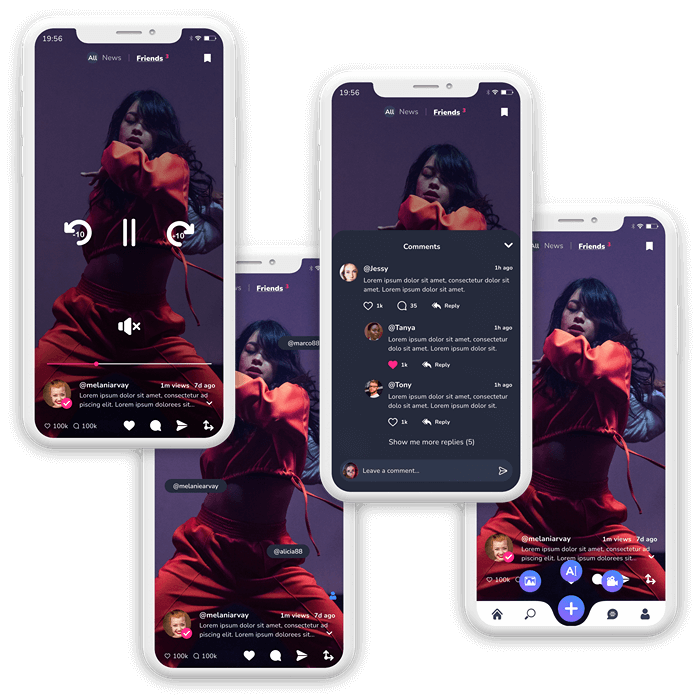
Interacting with Content
Any videos that you are watching on Dayblizz can be muted, paused and navigated after tapping on the video and interacting with the interface there. This allows you more control over your video watching experience.
Additionally you can interact with the content to view tags and engage in discussions with other users through comments.
And sharing your own content is only 2 taps away. Just tap on our colourful “+” button, select the content type you’d like to share and get started.

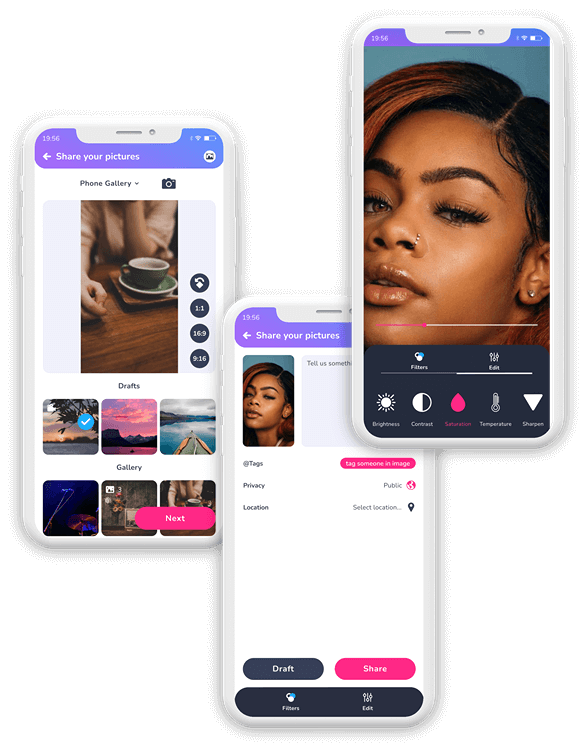
Uploading Content
Once you decide what to share with the community, you can first select the image or video that you’d like to share.
Then you can write a text, add tags, adapt the privacy settings (public/friends) and set a location, so peopple can find your content.
You can also do some quick colour adaptions through our filters and editing options.
Tagging Users
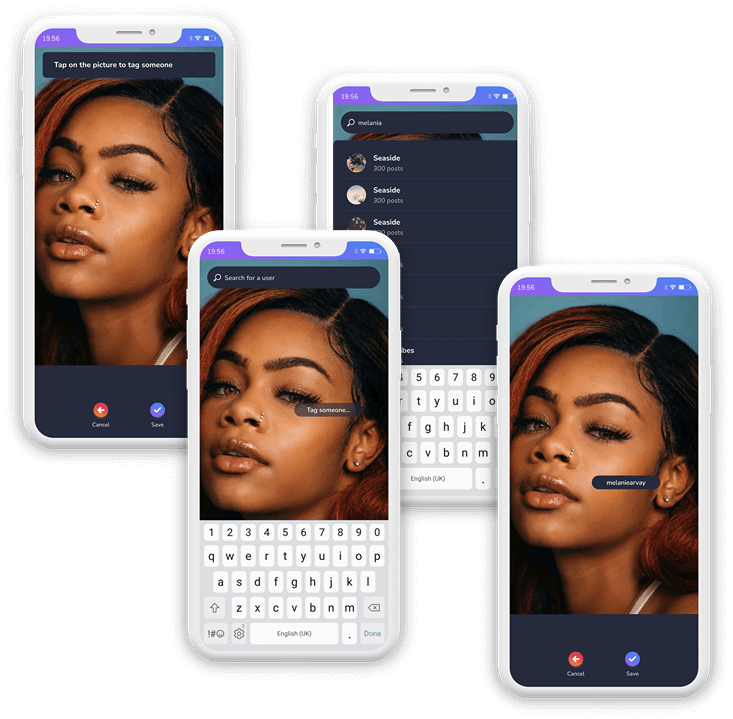
If you choose to tag people precisely in your uploaded content and tap on “tag someone in image”, then you’ll be lead to our tagging options. You can tap anywhere on the image, search a specific user and confirm the tag to show who is who on the image you’ve uploaded.

Editing Videos
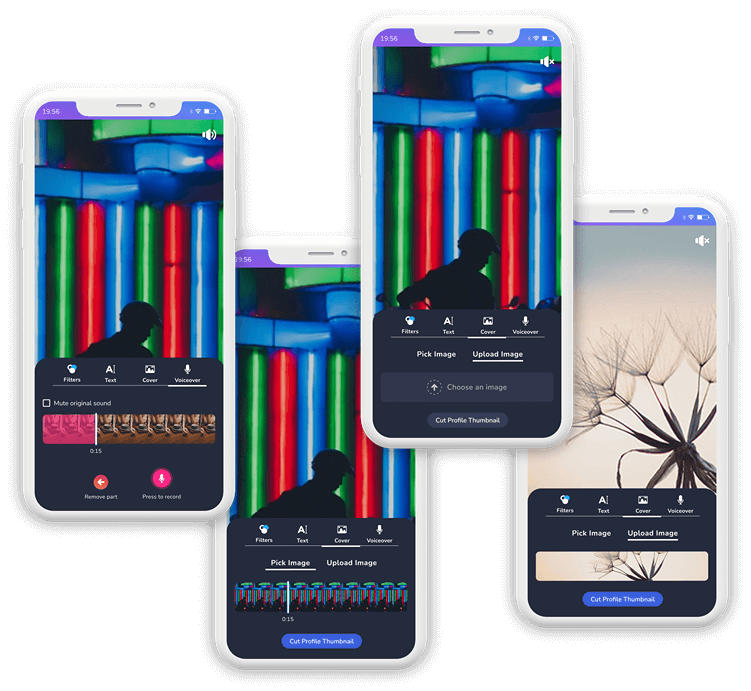
If you upload a video, the editing options will vary greatly from image editing options.
For example, you can choose to upload a new voiceover for your video and even mute the background sound by checking the checkbox if needed. In order to record your voiceover, you simply need to hold the “Press to record” button and speak to create your audio channel.
You can also pick a thumbnail/cover for your video. You can do so by either picking a specific frame of the video or by uploading a completely new image.
Then you can write a text, add tags, adapt the privacy settings (public/friends) and set a location, so peopple can find your content.
You can also do some quick colour adaptions through our filters and editing options.
Adding Text to Videos
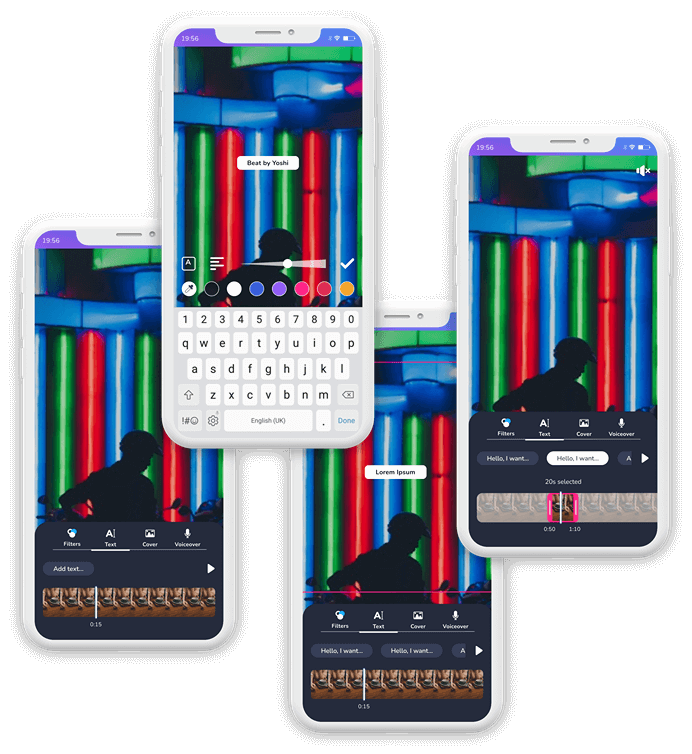
You can also write subtitles to your video or add any other text.
To achieve this you can tap on any part of the video preview, click on add text, add and edit your text and then drag the selection windows red bars to select the specific timeframe in which you’d like your text to be visible.


Content Discovery
In order to discover completely new content you can tap on the search icon in the menu and get to the discovery page, which displays a variety of image, video and interactive text content.
If you are searching for something specific you can tap on the search bar on top to reach the search page.
This page will show you your previous results as well as some recommended pages and hashtags to you. You can simple tap on search and enter your search phrase to find accounts, hashtags or locations that you’d like to find.
Messaging System
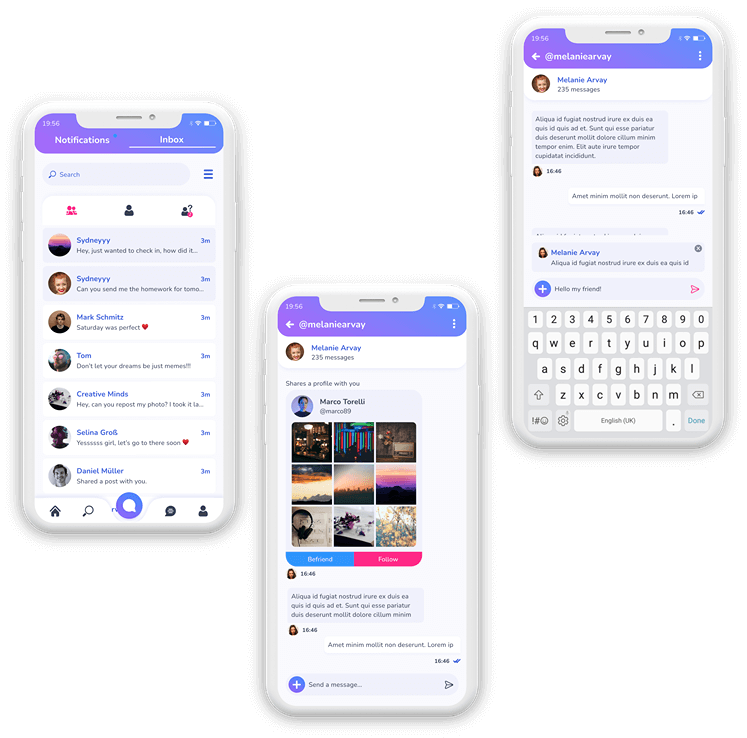
By tapping on the grey speech bubble in the lower menu you can get to our notification and messaging system.
The app chat is divided in three inboxes: Friends, general and message requests. If you don’t follow someone and aren’t friends with them, their messages end up in your message requests. As soon as you accept a message request, it will be listed in the general chats together with the messages from people that you follow.
The chat itself allows you for a variety of interactions, besides chatting, you can also send images, videos, emojis, stickers, gifs and of course share the content or profiles of other people. Additionally we allow you to directly quote a message of another user, so you can comfortably interact with them.


In-App Notifications
We made sure to keep your notifications in order. You can either view all your new notifications or tap on one of the items to filter your notifications in likes, comments/replies, follows & friendship requests, tags and shares.
By making your entire history available, we’re certain that you won’t miss out on anything important here.
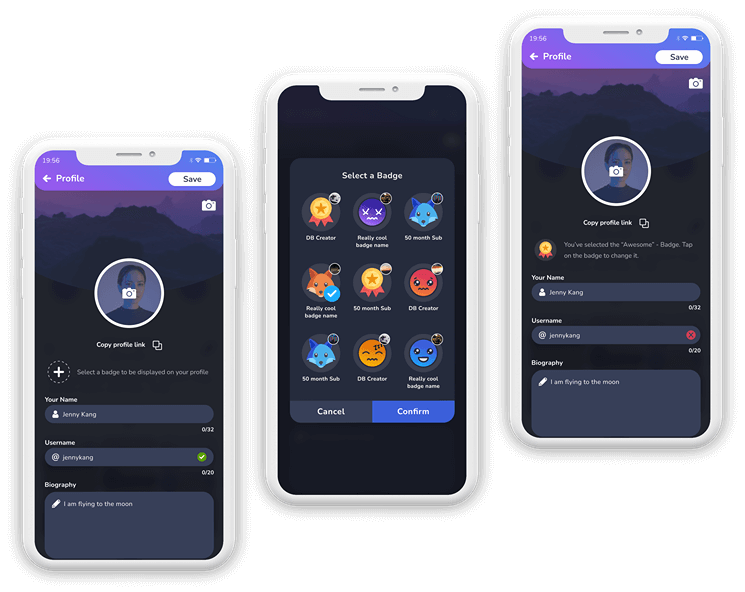
Edit Profile

Creator Accounts
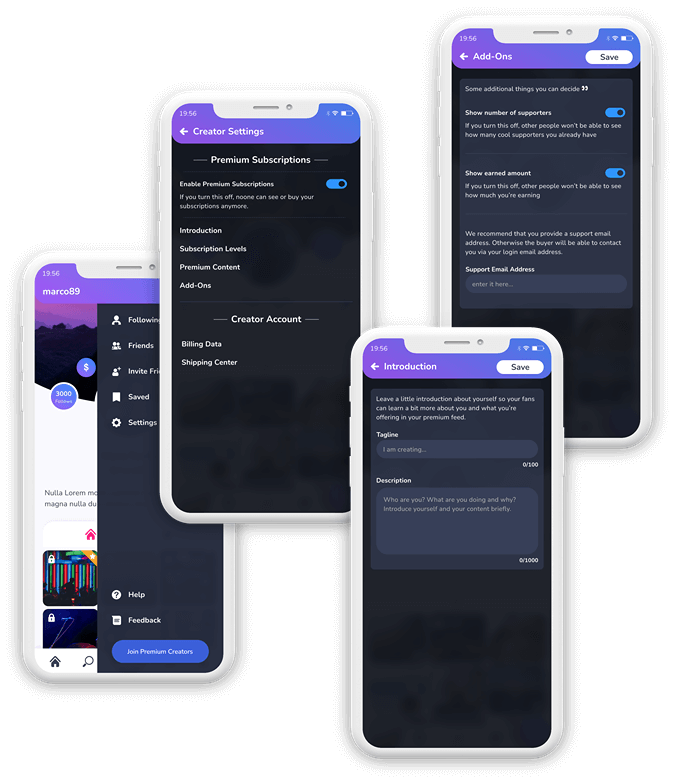
Becoming a Premium Creator
Everyone who wants to become an earning creator has to set up their creator account, by tapping on “join premium creators”. They will then first go through a KYC process by Stripe, before being led back to our app.
The “Creator” account consists of different parts. The “Creator” account settings list options to change billing data and edit different shipping tiers in the shipping center.
It also lists the different settings for Premium Subscriptions and allows to turn them on or off with the use of a single button. When creators go on a vacation, they can use this to temporarily (or permanently) halt their subscriptions – any active subscribers will be informed about this and won’t be charged for the time being.
The subscriptions themselves come with a variety of settings. First, the user can set a tagline to describe what exactly they’re going to offer in few words and additionally can add a description to introduce themselves and their work to their fans or potential subscribers.
They can also decide whether they’d like to make their number of supporters and their earned income public or hide it away.
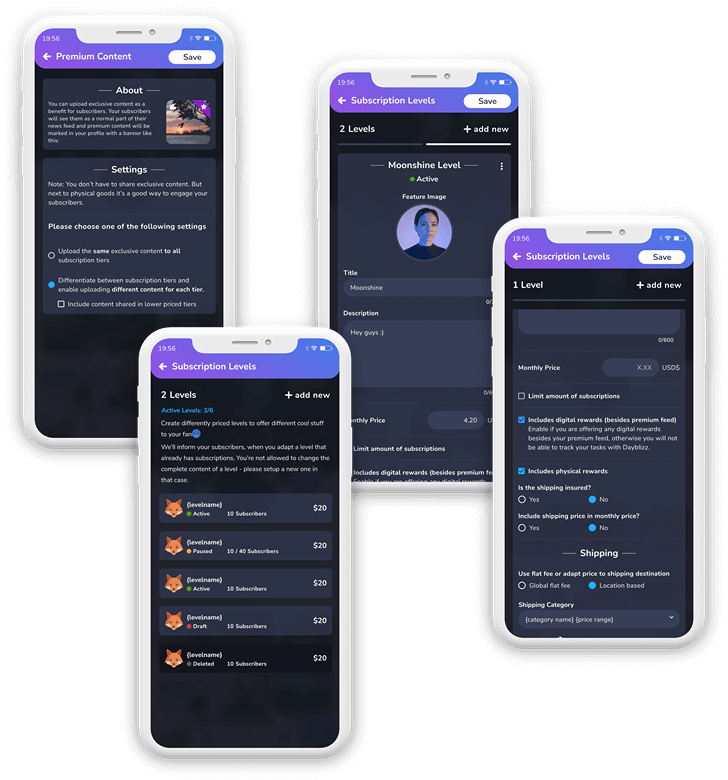
Setting up Subscriptions
Setting up subscriptions is a quick process. First of, the user can decide what content of theirs will be available exclusively as their reward content in subscriptions. They can choose between making the same content available to all their subscribers or differentiating between different subscription levels for their posts.
Then individual subscription levels can be set up. When the user adds a new subscription level, they need to at least set an image, title, description and price.
In order to also allow for physical rewards and digital rewards not shared on the Dayblizz platform, we add a checkbox, so the users can indicate that this is their wish. They’ll then be able to add specifications for the delivery of those rewards. For physical goods, the creator will be able to either include the shipping or create individual shipping tiers for different subscription levels to precisely manage international shipping of physical rewards.

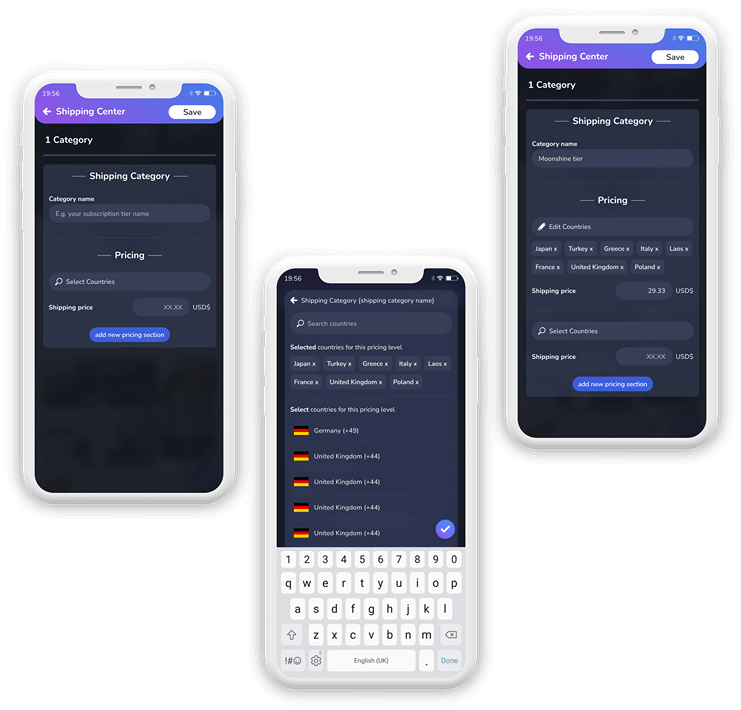
Shipping Category
In order to set up shipping categories, the user simply needs to give the shipping category a name, price and add countries.
For example: This shipping category could be “t-shirts”. The user can then add France, Germany and Belgium and add a shipping cost of $8. The user can then add the USA in another pricing segment for $6.
After saving the first category, the user can add additional categories to capture different scenarios. The name of the shipping group will then show up in the shipping list in the subscription settings, where the user only needs to select one option in a dropdown, in order to continue with the setup of their subscription and its shipping needs.
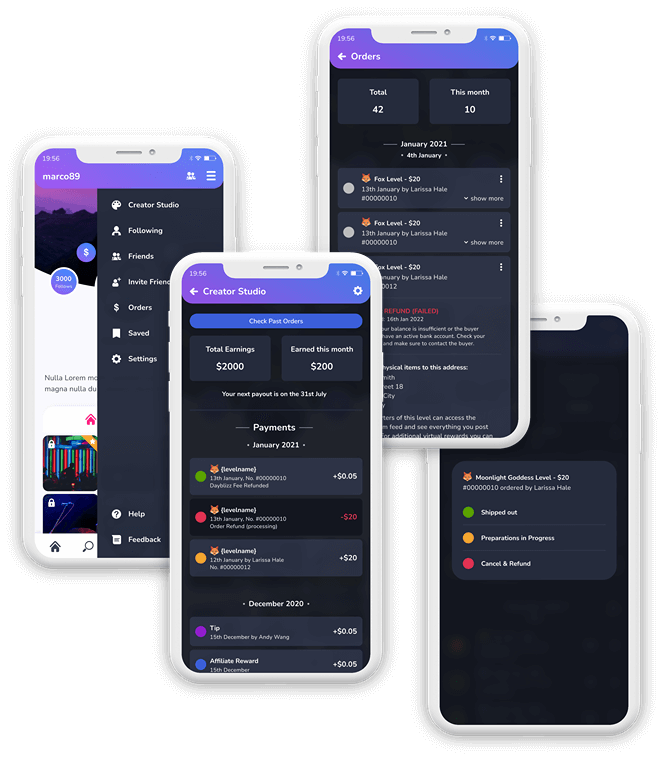
Creator Studio
The creator studio will be available to users once they have successfully set up their creator account.
The creator studio consists of data like total earnings, earnings this month, as well as a payment list and provides quick access to the creator account setup and the order list.
All subscription orders show up in the order area and help the user to identify which orders have been fulfilled and which ones are still to do. The user can check all relevant information in the order details and can also signal to their subscriber that the rewards have been shipped out, are currently being processed or refund the customer in case of any issues with the subscription.

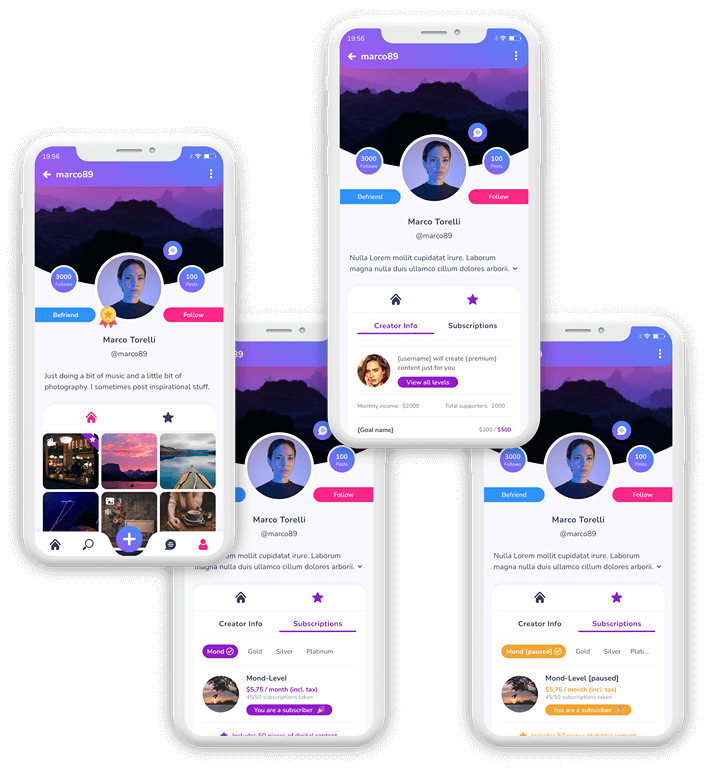
Creator Profiles
Users can easily subscribe to creators by clicking on the “star”-icon in the creators profile to view their creator profile.
The creator profile display the description and tagline created by the creator as well as the individual subscriptions.
All subscriptions are displayed in a row and details will be shown everytime a specific subscription is selected. Every subscription page features the subscription name, feature image, price, active subscriptions and explanations about the contents of it. Anyone who clicks to subscribe to one of the tiers is lead to Stripe to go through their safe checkout process.